Pages

Friday, March 15, 2013

Flourless Chocolate Peanut Butter Sandwich Cookies

Hi Everyone!
I am fnally back. I moved back to Alaska, and had a baby! 
So... yeah... I've been very busy. But for now I am settled in, baking and cooking as usual, so I figured I might as well show you all what I am whipping up in the kitchen.

Since I have been back in Alaska, I decided to start making some of my stuff gluten free. I am not gluten intolerant, but my hubby might be, so we have been trying to cut down. It has really made me stop and think about how much we can be dependent on flour. I think that by cutting out some flour, you can make room for other great grains, which can help open up your diet to new and tasty foods.
On my quest to cut down, I came up with these gems:


My Flourless Chocolate Peanut Butter Sandwich Cookies!!!!

So delicious, and not as sinful as you would think.
I'm serious!
Only about 125 calories per sandwich cookie. The actual cookie part are very low fat and calorie, it's the peanutbuttery goodness that gets ya.

For Cookies
2 1/4 cups confectioners' sugar
1/4 teaspoon salt
1 cup cocoa powder
3 large egg whites
2 teaspoons gluten-free vanilla extract
For filling
1 cup peanut butter
2 tablespoons softened butter
1/2 cup powdered sugar
3/4 cup light brown sugar
1 teaspoon gluten-free vanilla extract
Directions:

Cookies:

1. Preheat the oven to 350°F Lightly grease two baking sheets.
2. Stir all of the ingredients together until smooth. Scrape the bottom and sides of the bowl, and stir again till smooth. It will be a soft, batter-like dough.
3. Drop batter onto the prepared baking sheets using a teaspoon, then lightly flatten using the back of a spoon sprayed with cooking spray. Bake the cookies for 6-8 minutes. They should spread, become somewhat shiny, and develop faintly crackly tops.
4. Remove the cookies from the oven, and allow them to cool right on the pan.
Filling: 

5. Mix the butter and peanut butter until smooth.
6. Add the sugars and vanilla. Beat until smooth.
7. Form balls with aproximetly one tablespoon batter each.
8. Flatten each ball, then place between two cookies to form a sandwich.


I have made these a couple times now, and my hubby loves them. I mean, how can you not?
Enjoy!

-Laura

Wednesday, March 6, 2013

CarbMaster Yogurt from Kroger


I LOVE Yogurt. It's creamy, it's sweet, and it's good for you! What's not to love?
A little while ago I received a free 10 Kroger gift card from Bzz Agent, to buy some Kroger yogurt. We don't have a Kroger, but we do have a FredMyers which is in the Kroger family.
I was very excited to try the new Carbmaster yogurt from Kroger. Especially the Greek yogurt. I was also very excited when I saw the wide range of flavors.
I was very happy to see that the Greek yogurt had 50 percent of your daily calcium, and chock full of protein. WAY more than with Chaboni, and other similar products. I was very impressed.
All the yogurts were very thick, even the non Greek ones, and low in sugar. I like that.
My favorite flavors were Key Lime Pie, and the Black Forest Cake. My husband's was the banana cream pie. Delicious!
I would recommend them to anyone. They have a great price point too, at only 50 cents a cup. And that was in Alaska, where everything is more expensive. So go ahead and give it a try!


-Laura

Thursday, November 24, 2011

Pumpkin Cheesecake Pie

Happy Thanksgiving everyone!
I hope everyone is doing well, and enjoying the Holiday season! I love Thanksgiving, but I have to admit, I have been a slacker in the kitchen this year. I'm just super busy, because we are moving in a few weeks! To ALASKA!!! Yes, in November. At least it's not January. I'm from Alaska, born and raised, so I'll get used to it again. So now you can see why we've been so busy!
Through the business, we were able to fit in a few traditional dishes that we always have each year. My husbands favorite is my Pumpkin Cheesecake Pie. It's a fun twist on the classic pumpkin pie that always gets gobbled up fast. It also has a delicious vanilla frosting to top it all off. Hope you enjoy!


My Pumpkin Cheesecake Pie

Ingredients:
For Crust
1 1/4 cups graham cracker crumbs (this year I used arrowroot cookie crumbs. It really doest matter what kind of cookies you use. Gingersnap cookies would also be nice too.)
1/4 cup butter or margarine
2 tbsp. sugar
1 tsp. cinnamon

For Filling
1 1/2 8 oz. packages of cream cheese, room temperature
2 eggs
1/2 cup canned pure pumpkin
1/2 cup sugar
2 tbs. light brown sugar
1/2 tsp. vanilla extract
1/2 tsp. pumpkin pie spice

For Topping
1/4 and 1 tbs. cup sour cream
2 tbs. sugar
1/4 tsp. vanilla extract

Directions:
Preheat oven to 325 degrees.

Combine all crust ingredients and mix thoroughly. Spread crust mixture into bottom of pie plate and firmly press, using your hands or a flat utensil to the pie plate to form the crust. Set in fridge.

In a large bowl, combine all filling ingredients. Using an electric mixer set to medium speed, mix until completely blended and as lump-free as you can get it. Pour mixture into the prepared crust.

Bake in the oven for approximately 1 hour, until set. Allow pie to chill in the fridge for at least 3 - 4 hours (overnight is best).

When it's closer to the time you want to serve, mix all topping ingredients together until thoroughly blended in a small bowl. Spread topping evenly over the pie.

Return pie to the fridge until ready to serve. Cut pie into 12 slices.

Hope you all have a safe and happy thanksgiving everyone!

Friday, November 4, 2011

Birthday Monster Bash

Hi everyone!
It's so nice to be back! I have been crazy busy with everything going on lately. Logan's 7th birhday was a couple of days before Halloween, so there was plenty do do, with preparing for his birthday, then his party, and of course Halloween! And to top it all off, I have been having trouble downloading pictures from my camera onto my computer. I bought my computer when Logan was around 1, so that tells you how old my poor computer is. Young for a child, but ancient in the technology world!
So I finally was able to get the pictures downloaded and I can finally share the best (If I dare say so myself) birthday party I've ever planned.
While browsing through party ideas on Pinterest I found a bunch of neat ideas for a Monster themed party, and knew that I had the perfect theme! Logan was all for it. He loves spooky stuff for his birthday, with how close it is to Halloween.
First I will show you the pictures, and then I will  be share with you my tips and tricks as to how I was able to pull it all of with very little stress. Also a first!
 
 First up, are these cute monster cutlery holders.They really add an interesting focal point to the decorations, and are so easy and inexpensive to make! I show how I made them here.


 Nest is this very creepy, yet still delicious soda pops. The kids all got a kick out of the strange names on the labels.


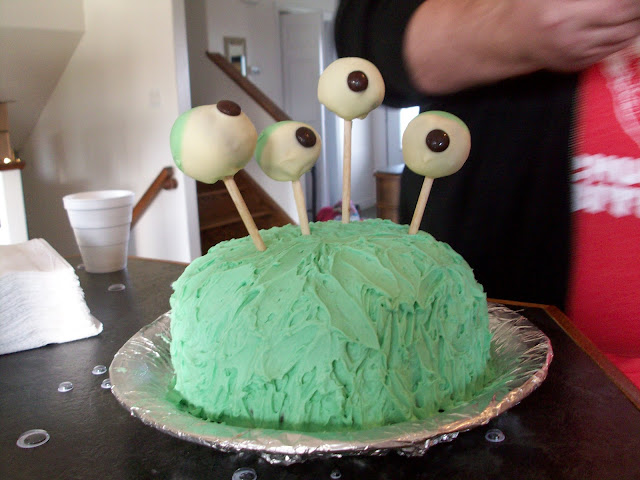
And...last but not least, the Monster cake! This was my favorite to make and it was so delicious! All the kids wanted to eat a chocolate truffle eyeball!


I decided that I didn't want to take away from the cake by adding candles, so I made a monster hand out of white chocolate dyed with food coloring to hold the candle. Here's my honey lighting the candle.


I just love the excited look on his face.


 And the wonderful birthday boy blowing out the candle!


And when the kids were ready to leave, they all got one of these adorable treat backs that I created out of consttruction paper, and paper bags. Logan helped me color the party hats on the monster heads. I was so pleased with how they turned out!


 The party was great! All the kids had so much fun, and by doing these things I was able to stay organized and stress free:

1. I  got inspiration and was able to stay organized using Pinterest, and Google Docs. Great sites to help you keep track of everything.  I used Pinterest to find ideas, and to keep them all in one place. I used this pinboard to keep track of ideas for the party. It saved me a lot of time, and gave me so many great ideas. I used Google Docs to create a shopping list and menu. I love using a word document for lists because it's so easy to change things when you need to.
2. Once I got my ideas all together on those sites, I set to work. I always plan ahead. For this party I started about 2 months ahead. People always tease me about my penchant for early planning, but it really makes my life so much easier.  Just pick a project every few days in your spare time. You will be surprised about how much more relaxed you will be when you do a little here, a little there.
3. Don't go overboard with the invites. I initially wanted to invite over 10 kids, when my hubby  reminded me what a handful a group of young kids can be. Logan and I pared down the list to 8, and 6 made it. That was the perfect amount if you ask me. Remember to always invite more people than you want to come, because there will always be a few that can't make it.
4. Don't forget the party games! I googled monster party games, and found a lot of great ideas.
5. And finally, keep it simple. I had to go back to my lists several times to get rid of things that wern't necessary. I don't know about you, but I always plan way to much food. I'm glad I did go back and change ideas here and there, because it made this less hectic.

So that's how we did it. Simple and almost stress free. Hope you enjoyed looking at the party photos, and that the tips will help you with your next shindig!

Sunday, October 23, 2011

Liebster Blog Award


I am so happy to say that I received the Liebster Award from Sara from DIY Goddess In Training. I am so honored! Please check out her blog and while your at it check out the five blogs I awarded the Liebster Award to they are all amazing bloggers.


This award spotlights up and coming bloggers who generally have less than 200 followers.

Thank you so much Sara from DIY Goddess In Training for passing on this award to me! Please take the time to check out her blog. 


Upon receipt of the Liebster Award, there are a few very simple rules:

1. Copy and paste the award on your blog.
2. Thank the giver and link back to the blogger who gave it to you.
3. Reveal your top 5 picks and let them know by leaving a comment on their blog.
4. Hope that your followers will spread the love to other bloggers

Now it's my turn to pass this award on and spotlight 5 great up and coming blogs! Please do feel free to check them out!


Thanks Sara! Remember to go check her out at DIY Goddess In Training

Friday, October 21, 2011

Laura's chocolate chip cookie dough brownie cake

I have been seeing pictures around the internet of something I knew that we just had to try right away: chocolate chip cookie dough brownies.
My son Logan always wants to eat raw cookie dough. Every time he see's me whipping something up, the question always is: "Does that have raw eggs in it?" I am a freak when it comes to raw things. I refuse to eat sushi unless its California veggie rolls, I only eat steak that's well cooked, and I DON'T eat raw cookie dough!  So unfortunately for Logan, I would always say yes it does, and not let him have even the tiniest taste. Poor Logan.
So, when I saw this recipe, I was so relieved to see that the cookie dough is egg free! HOORAY! We can finally have our cake and eat it too. Literally!
So I finally set to make some for ourselves.  I had to adjust the recipe to fit our ingredients, and the pans that we have on hand, so I decided to add my own touches, scale down her recipe, and make it into a cake instead of a brownie bar. Here is what I came up with:

Laura's Chocolate Chip Cookie Dough Brownie Cake


Ingredients:

Brownie layer
2/3 cup semi sweet chocolate chips
1/2 cup butter, at room temperature
1 cup light brown sugar, packed
2 large eggs
1 teaspoons vanilla extract
1/2 cup all-purpose flour

Cookie Dough Layer:
1/2 cup butter
1/2 cup light brown sugar, packed
1/2 cup granulated white sugar
1 1/2 Tablespoons milk
1 teaspoons vanilla extract
1 cups all-purpose flour
1 cup chocolate chips
1/4 cup semisweet chips
1/4 teaspoon canola oil

Directions:

1. Brownie Layer: Preheat oven to 325 degrees F. Grease a 9-inch pie plate. In a medium glass bowl, melt chocolate in the microwave, stirring every 30 seconds until smooth. Set aside to cool slightly. In a large mixing bowl, mix butter and brown sugar with an electric mixer. Beat in eggs and vanilla extract. Mix in melted chocolate. Blend in flour and mix just until combined (don't over-mix). Spread batter into prepared pan. Bake 25 to 35 minutes. Remove from oven when toothpick or knife inserted into the center comes out clean. Let cool completely.
2. Cookie dough layer: In a medium bowl, use an electric mixer to combine butter, brown sugar and white sugar. Mix in milk and vanilla. Mix in flour, by hand just until combined. Stir in chocolate chips.
3. Spread cookie dough over the cooled brownies. Then melt remaining chocolate chips with the oil in a small bowl, stirring every 30 seconds, until smooth. Spoon into a plastic baggie and snip of the tip,  then squeeze onto the brownie in whatever pattern you wish. Refrigerate until the dough is pretty firm. I always just use the freezer, just to speed things up. When dough is firm, cut into 8 wedges using a sharp knife. Wipe the knife off with a paper towel in between cuts since the fudgy layers of brownie and cookie dough will stick to the knife.

And there you have it! Perfect for all raw cookie dough and brownie lovers alike!

-Laura

Friday, October 14, 2011

Featured: How to make monster cutlery holders on DIY Goddess in Training

 Today I was featured on a great blog called DYI Goddess in training, from a great gal named Sara. I love the name of her blog because that's what I strive to be too! One new recipe or craft project at a time. Which is what I did for the guest post. Crafts! I live for making things. Sara asked me to do a fall themed craft. I was in the middle of making some monster decorated cutlery holders for Logan's party, so I decided to do that. So, please stop by her blog HERE and learn how to make this cute guy for your upcoming Halloween/monster party.


                                            -Laura